A Simple Foam Roller Routine for Better Posture
At a Glance
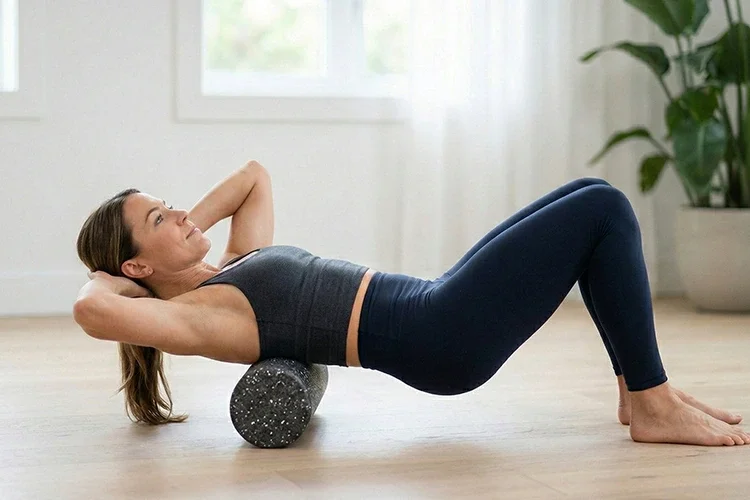
Click a point below to jump to the details.Unsticking tight upper back muscles to help reverse a rounded shoulder posture. (Image: AI-generated)
If you feel like your back is constantly hunched over after a long day at your desk, you are not alone.
That heavy, stiff sensation in your upper and middle back—what experts call the thoracic spine—is a common side effect of our modern digital lifestyle.
This means it actually helps "unstick" the tight connective tissues that keep you in a rounded-shoulder position.
Why Mid-Back Flexibility Matters for Your Entire Body
Your upper back is designed to be the mobile center of your torso. It should be able to twist, bend, and lean back easily.
When this area gets stiff, your body tries to find that movement somewhere else, usually by overworking your neck or your lower back. This is why a "stiff back" often leads to "neck pain."
By restoring movement to your mid-back, you take the pressure off your joints, breathe more deeply, and stand noticeably taller.
Where to Place Your Foam Roller
Getting the best results starts with putting the roller in the right place. Many people roll too far down, which can actually cause discomfort.
The Safe Zone
Try placing the foam roller horizontally across your mid-back, right at the bottom of your shoulder blades.
Protect Your Lower Back
It’s a good idea to stay away from your lower back (the lumbar area). These vertebrae don't have the rib cage to act as a protective shield, so direct, heavy pressure there can feel too intense or even risky.
The "Cradle" Position
Support your neck by cupping your head in your hands. Point your elbows forward rather than out to the sides; this moves your shoulder blades out of the way so the roller can reach the muscles closer to your spine.
The "Spinal Unwind" Routine
This routine is best done in the evening to "undo" the slouching you did during the day.
Remember, the goal is relaxation, not a workout.
With your hips on the floor, lean back slowly over the roller. Imagine your spine gently melting over the curve of the foam.
Take a slow, deep breath. As you exhale, let your head and shoulders sink toward the floor a little more.
Hold this "open" position for 15 to 30 seconds. You might feel a satisfying release in your chest and front shoulders too.
Lift your hips slightly and roll an inch or two upward, then repeat the process.
Focus on the area between your shoulder blades. If you find a spot that feels extra tight, stay there and breathe into it for 30 seconds.
Visual Guide: Your 5-Minute Daily Spinal Hygiene
To help you master the exact movements discussed above, we have selected a professional guide that perfectly demonstrates how to "unstick" your upper back.
This routine treats your posture with the same daily care as brushing your teeth—simple, essential, and highly effective. Pay close attention to the rib placement and breathing cues to ensure a safe and deep myofascial release.
Video Credit: REACH Rehab + Chiropractic Performance Center
*Watch from 03:47 to jump straight into the 5-minute spinal hygiene routine.
Frequently Asked Questions
-
It’s very common to hear a popping or cracking sound—much like cracking your knuckles. This is usually just a harmless release of air bubbles from the joints or tight tendons sliding over muscle. As long as it doesn’t come with sharp pain, it’s generally nothing to worry about. If it feels uncomfortable, simply apply less body weight.
-
It’s generally best to avoid using a standard foam roller directly on the lower back. Unlike the upper back, your lower back relies on deep core muscles for stability, and heavy pressure can sometimes cause those muscles to "seize up" to protect the spine. If your lower back is stiff, try rolling your glutes and hip flexors instead—often, the tension in your lower back is actually coming from those areas.
-
Consistency beats intensity every time. For most people, 5 to 10 minutes once a day is ideal. You’ll likely feel an immediate "openness" after one session, but lasting changes in your posture usually take about 2 to 4 weeks of daily practice as your body adapts to the new range of motion.
Staying Safe While You Roll
Foam rolling is a wonderful home remedy, but it’s important to listen to your body’s signals:
"Good Hurt" vs. Pain
You’re looking for a "satisfying release"—that feeling of a tight knot finally letting go. If you feel sharp, stabbing pain or numbness, stop immediately and adjust.
Medical Consultation
If you have a history of osteoporosis or spinal issues, it is very important to chat with your doctor or a physical therapist before starting a rolling routine.
Less is More
Avoid rolling the exact same spot for more than 2 minutes to prevent bruising. Short, consistent sessions are always more effective.
Sources & References
- [1] Cheatham, S. W., et al. (2015). "The Effects of Self-Myofascial Release Using a Foam Roll or Roller Massager on Joint Range of Motion, Muscle Recovery, and Performance: A Systematic Review." International Journal of Sports Physical Therapy.
Read Next